Friday, March 29, 2013

Stamp a Stack Club Cards

Happy Friday!  I hope wherever you are, it's beginning to look like spring!

For our February Stamp a Stack Club, we used the stamp set C1533 Fabulous You.

One of the papers used was from X7164B, Buzz and Bumble.  The rest of the papers are retired designs.  Each month in the Stamp a Stack Club, one creates 10 unique cards designed by me.  In your Stamp a Stack Club package, you receive a stamp set, and all the paper and embellishments to create these cards for only $27!  If you'd like to join the club, whether you are near or far, please email me and I'll get you set up.

~~~~~~~~~~~~~~~~~~~~~~~~~~~~~~~~~~~~~~~~~~~~~~~~~~~~~~


FREE Workshop on the Go Kit
How would you like to get a free Workshop on the Go kit?  How, you ask?  Simply purchase any five (5) Workshops on the Go in one order and you'll get the sixth one FREE!  Plus, receive $25 in free Hostess Rewards.  That's $54.95 in Free products!  Don't forget, you can also get the Stamp of the Month for only $5 with your order.  In order to take advantage of this special, you must email your order to me.   Do not place the order from my website as you won't be able to enter the free items there.

Visit my website to see all of the Workshops on the Go that are available.  This offer is good March 1-March 31 and only available through Suzastampin.

Thursday, March 28, 2013

Love your Layout


Use Studio J®, Close To My Heart's online scrapbooking software, to create a festive layout in just minutes by watching this month's Love Your Layout(sm) video. You'll learn creative techniques on how to add your own stitching, create a top border with journaling, and more. Log in to Studio J to create it yourself while you watch!


The paper packet used for this layout is Pear & Partridge.  I loved that paper!  Be sure to check out the layouts and cards I created with it.  Pear & Partridge is no longer available in the paper pack, but it's always available on Studio J® to do your holiday layouts.

Wednesday, March 27, 2013

Create a Card

Here is another card created with CTMH's D1525 Casual Expressions stamp set.  The papers used are from the Dakota My Reflections® Kit.

Here's what you'll need to recreate it.  It's a quick and easy one.


4 ¼” x 5 ½” side fold card base

4 ¼” x 5 ½” Pacifica card stock
2” x 4” Dakota Paisley Background and Texture Paper
3 ¼” x 4” Dakota Wood Background and Texture Paper

Attach Blue Paisley to top of Pacifica card stock
Attach Barn Wood paper to bottom of Pacifica card stock
Attach Zip Strip across seam. (Zip Strip comes on the top of the Background and Texture paper)
Stamp sentiment with Barn Red.  Attach to card front with foam dots.
Ink star with Pacifica and attach with foam dot.
Insert three pewter brads as shown.

Tuesday, March 26, 2013

Technique Tuesday

Muslin Gift Bags

Say “thanks” by giving a gift that is personalized down to the very bag itself with My Creations™ muslin drawstring bags. Simply stamp and fill with goodies!

Monday, March 25, 2013

Magic Monday

This week's Magic Monday layout was created using Close To My Heart's Studio J® digital program.  The layout is from the Magic book and is called Performance. You'll find the sketch HERE.

I used one of the new My Reflections kits from the Spring/Summer Idea book called Chantilly. There's a lot of great, fun embellishments for this kit!


You'll notice the sketch is different from the actual layout.  Both pages were rotated 90 degrees. 

Friday, March 22, 2013

Our Mediterranean Cruise

This layout is a Studio J® layout that I created from the Mediterranean cruise that my Cruisin' Buddy and I took back in 2008.  I earned the cruise from Close To My Heart and we had a blast!  It was a trip of a lifetime!

We arrived a three days ahead of the cruise.  In those three days, we went to London, took the Euro Star from London to Paris for a day, and then arrived in Barcelona for a full day before we boarded the ship.  In Barcelona the main street is called Las Rumblas.  It is full of street vendors and street people dressed to look like they are mannequins.  They stay perfectly still until you throw a coin in their can. Then they start to perform.  The photos in this layout are just a small sampling of all of them.  There were many more!

The paper used in the layout and all through our scrapping of the trip is called Vintage Travel.  It's been retired (and we bought a ton of it before it did! LOL).  It is available still in Studio J.  Thank goodness as I don't think we bought enough to finish our books.  You know how that is...you say you're only going to scrap a small percentage of the photos you take (I took 3000 and printed about 1000), then you keep seeing pictures that you just have to scrap.  LOL!  Be sure to click on the photo to enlarge it.


Some day we are going back!!

Thursday, March 21, 2013

Love your Layout

Use Studio J®, Close To My Heart's online scrapbooking software, to create a beautiful layout in just minutes by watching this month's Love Your Layout video. You'll learn creative techniques on how to design with My Stickease® images, create your own custom titles, and more. Log in to Studio J to create it yourself while you watch!


This layout was created using the Clementine papers if you'd like to scrap it traditionally.  Funny thing....I used the same papers and layout to create a traditional layout.  Here's a link to my pages.

~~~~~~~~~~~~~~~~~~~~~~~~~~~~~~~~~~~~~~~~~~~~~


FREE Workshop on the Go Kit
How would you like to get a free Workshop on the Go kit?  How, you ask?  Simply purchase any five (5) Workshops on the Go in one order and you'll get the sixth one FREE!  Plus, receive $25 in free Hostess Rewards.  That's $54.95 in Free products!  Don't forget, you can also get the Stamp of the Month for only $5 with your order.  In order to take advantage of this special, you must email your order to me.   Do not place the order from my website as you won't be able to enter the free items there.

Visit my website to see all of the Workshops on the Go that are available.  This offer is good March 1-March 31 and only available through Suzastampin.

Wednesday, March 20, 2013

Create a Card

For this card I used Close To My Heart's Clementine My Reflections® Kit.  The stamp set used is D1525 Casual Expressions.


Here are the cutting instructions:


4 ¼” x 5 ½” side fold card base

4 ¼” x 5 ½” Sorbet card stock
4” x 5 ¼” Twilight card stock
1 ¼” x 2 ¼” Twilight card stock
1” x 2” Crème Brulee card stock
3” x 3” Crème Brulee card stock
2 ¾” x 2 ¾” Clementine Background and Texture paper Floral Side
1” x 4” Clementine Background and Texture paper Sorbet side

Stamp sentiments with Twilight ink.
Attach Twilight card stock to Sorbet card stock
Attach Clementine Sorbet Side ½” from bottom.
Attach Clementine Floral to Crème Brulee card stock. Attach ¾” from left and top.  Attach Sorbet waxy flax as shown.  Cut random triangles for banner and attach. Attach sentiments as shown.  Tie bow in Sorbet Baker’s Twine and attach.

Tuesday, March 19, 2013

Techique Tuesday

Did you know that embossed images resist ink? Learn this fun trick to ink the areas around your embossed images to make them really stand out!

Monday, March 18, 2013

Magic Monday

This layout was created using CTMH's Studio J® software and one of the paper packets that is exclusive to Studio J®.  It's called Love Bird.  The layout is from the Magic Idea Book and is called Mystify.  You may download the Mystify sketch HERE.


I love working in Studio J®.  It makes creating a layout so quick and easy.  It's a great way to design and embellish a layout without making any mistakes. 

Saturday, March 16, 2013

Eiffel Tower Calendar

Here's another page from the Eiffel Tower calendar that I made for my Paris loving Cruisin' Buddy.  The calendar was created in Close To My Heart's Studio J® digital program and then the purchased layouts were uploaded to Snapfish to create a 12x12 calendar.  At the time, Snapfish was having a special, Buy 1 calendar and get 2 free.  So, if this is something you may want to do, just keep checking Snapfish to see if they have an offer going.

Some day we will get back there and spend more than one day and see everything!  It's on our Bucket List.

Have a great weekend, everybody!

Friday, March 15, 2013

Studio J Express Collections

What are Express Collections?
In addition to creating your own custom layouts from scratch, we have just added Express Collections. This includes nine Express Collections you can use to quickly and easily create beautiful layouts. Each themed Express Collection includes 10 two-page coordinating, fully embellished layouts, plus a front and back page for your album, that are professionally designed and nearly complete—you simply drag in your photos and add your title and journaling! You can choose to create all 10 layouts plus the covers, or create just a few of the layouts in the collection. It’s up to you. Express Collections makes getting your photos off your camera card or computer and into gorgeous layouts faster than ever!

Head on over to Studio J® and take a peek!


Thursday, March 14, 2013

Love your Layout


Use Studio J®, Close To My Heart's online scrapbooking software, to create a beautiful layout in just minutes by watching this month's Love Your Layout video. You'll learn creative techniques, including how to apply photo filters and create ruffled ribbon. Watch the video here and then log in to Studio J to try it yourself!


The paper used in this video is called Moonlight.  The paper packet is retired, but it's always available on Studio J to scrap those great Halloween photos!

Wednesday, March 13, 2013

Create a Card

This week's card was created with Close To My Heart's Dakota My Reflections® Kit.  The stamp set used is D1525 Casual Expressions.


Instructions to recreate it:


4 ¼” x 5 ½” side fold card base

4 ¼” x 5 ½” Pacifica card stock
2 ¾” x 3 ½” Pacifica card stock
1 ½” x 4” Dakota Background and Texture paper (check side)
1 ¾” x 4 ¼” Barn Red card stock
2 ½” x 3 ¼” Dakota Paisley Background and Texture paper

Stamp sentiment with Pacifica.  Stamp one star with Pacifica on Pacifica card stock and one with Barn Red on Barn red.  Cut out and shape.
Attach Dakota Barn Wood Background and Texture paper side up to Pacifica card stock.  Attach Blue Paisley to Pacifica.  Attach this ½” from bottom and ¼” from left side.
Attach Dakota Background and Texture paper to Barn Red card stock and attach ¼” from bottom and ¾” from right side.  Attach sentiment.  Attach stars with foam dots.

Tuesday, March 12, 2013

Techique Tuesday

Learn how to create a random pattern for a background design on your paper. Just stamp the image of your choice randomly on the page for results that are unique and stunning!

Monday, March 11, 2013

Fabric and Frame

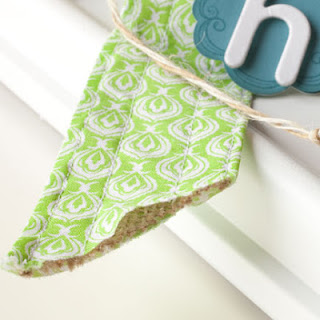
One way to add texture, color, and pattern to a piece of home décor is with fabric. The new Chantilly textiles make it easy to embellish with fabrics that include the beautiful colors and patterns that are typical of Close To My Heart. In the frame décor featured on page 16 of the Spring/Summer 2013 Idea Book, pieces of Pear damask and Buttercup polka-dot fabric from the Chantilly textiles, as well as burlap ribbon, add a little something extra to a standard white frame. Follow these simple steps to incorporate fabric into an embellished frame that you can hang anywhere.


1. Determine how long you’d like the finished ribbon and bow. This is based on the size of your frame and if you’ll be hanging it. If you are hanging it on a wall or door, you’ll need enough ribbon to wrap around the top of the frame a couple of times and still have a long strip coming out the back of the frame.

2. Cut enough strips of fabric to equal your desired length, making sure the strips are about 3½" wide to wrap around the burlap ribbon.

3. Sew the short ends of the strips together to create one long strip that equals the finished size you need for the project.

4. Fold the long fabric strip around a piece of burlap ribbon of the same size and secure temporarily with a straight pin.

5. With a sewing machine, carefully sew four straight lines down the length of the fabric-wrapped burlap ribbon. This will keep the burlap from moving around or bunching up inside the fabric.

 6. Loop and hot glue the fabric-wrapped burlap ribbon around the top of the frame a couple of times so that it is nice and sturdy for handling and hanging.

7. Tie the remaining fabric-wrapped burlap ribbon into a large bow. Fold the tails of the bow into a wave and hot glue to the frame to secure the shape.

 8. Embellish frame with accessories, as desired.

 Easy, isn’t it? Now you have a beautiful piece of fabric-embellished home décor that you can show off to friends, family, and especially your customers! Check out the Easy, isn’t it? Now you have a beautiful piece of fabric-embellished home décor that you can show off to friends, family, and especially your customers! Check out the Chantilly and For Always textiles in the Spring/Summer 2013 Idea Book to get your creative juices flowing for more project ideas with fabric.

Saturday, March 9, 2013

Eiffel Tower Calendar

Here's another page from the Eiffel Tower calendar that I made for my Cruisin' Buddy.


I used the La Belle Vie papers in CTMH's Studio J® digital program. This gorgeous Parisian paper is only available through Studio J as it's been retired. It only takes 6 layouts as the JPEGs come through with each page being a separate file.  Then I uploaded them to Snapfish when they had their Buy 1 Calendar, get 2 Free.  And, it just so happens that Snapfish is having that same special right now through March 17.  Simply add the code CALMAR13.  I've done this twice and it's such a bargain! You'll want to use the Simply Elegant back ground as you can slide the JPEG in to where it shows just one picture.  At Snapfish you have the opportunity to order 12x12 calendars.  I didn't find that option available on some of the other printing sites.
~~~~~~~~~~~~~~~~~~~~~~~~~~~~~~~~~~~~~~~~~~~~~~~~~~~~~~~~~~~~~~~~

In order to allow even more time for you to create and purchase Studio J® layouts at the wonderful $5 per layout price, this offer has been extended. Now through March 15, 2013, all Studio J layouts will be $5!* That’s $1.95 savings per each two-page layout!

It’s the perfect time to get clicking with ready-made Express Collections or customize layouts with embellishments, My Stickease® accents, and unique papers and color combinations of your own. If you’ve never tried Studio J before, what are you waiting for? You’ve taken the photos. Now keep the memories!

*Shipping/handling applies. Studio J credits must be redeemed before this promotion can be applied. Offer valid February 1–March 15, 2013.

~~~~~~~~~~~~~~~~~~~~~~~~~~~~~~~~~~~~~~~~~~~~~~~~~~~~~~~~~~~~~~~~

Jump for Joy


During the month of March, hostesses “jump” to the next level of Hostess Rewards when a Gathering reaches $250 or more!* More discounts and free product for hostesses. Now that’s a reason to jump for joy!

*Shipping/handling and tax applies. Only Gatherings with a total of $250 or more will qualify for the jump in Hostess Rewards or Hostess Rewards Plus! Qualifying hostesses will receive Hostess Rewards from one level only—the level that is one higher than their sales total. Offer valid March 1–31, 2013.

View Rewards 

~~~~~~~~~~~~~~~~~~~~~~~~~~~~~~~~~~~~~~~~~~~~~~~~~~~~~~~~~~


 FREE Workshop on the Go Kit
How would you like to get a free Workshop on the Go kit?  How, you ask?  Simply purchase any five (5) Workshops on the Go in one order and you'll get the sixth one FREE!  Plus, receive $25 in free Hostess Rewards.  That's $54.95 in Free products!  Don't forget, you can also get the Stamp of the Month for only $5 with your order.  In order to take advantage of this special, you must email your order to me.   Do not place the order from my website as you won't be able to enter the free items there.

Visit my website to see all of the Workshops on the Go that are available.  This offer is good March 1-March 31 and only available through Suzastampin.

Friday, March 8, 2013

Studio J in so Many Ways

These layouts were all created digitally in Studio J® in just a little bit of time.  The papers used are from the new Close To My Heart Spring/Summer 2013 Idea Book.  It's called For Always. This paper is fantastic to use for wedding layouts.  Just choose the accent color to match your wedding colors.


If you'd like to see all the papers in the For Always paper packet, click here.  Hop on over to Studio J® and have some fun playing!  Not a digital scrapbooker?  No problem!  Design your layouts in Studio J® and scrap with the paper For Always My Reflections® kit.

Thursday, March 7, 2013

Love your Layout


Use Close to My Heart's online scrapbooking software, Studio J®, to create a beautiful layout in just minutes by watching this month's Love Your Layout video. You'll learn creative techniques, including how to create a journaling box with a photo background. Watch the video here and then log in to Studio J to try it yourself!


If you'd like to recreate this using tradtional scrapbooking, the paper package used in this layout is X7157B Dakota.

Wednesday, March 6, 2013

Create a Card

This week's card uses papers from Close To My Heart's Clementine My Reflections® Kit.
The stamp set used is D1525 Casual Expressions.


What you need to recreate this card:

4 ¼” x 5 ½” top fold card base

4 ¼” x 5 ½” Twilight card stock
1 ½” x 3 ¼” Clementine Background and Texture paper  (Other side of floral)
1 ¾” x 3 ½” Sorbet card stock
2” x 2 ½” Crème Brulee card stock
1 ¾” x 2 ¼” Blue dot Background and Texture Paper (from the retired Dreamin' Kit)

Round top corners of the Crème Brulee card stock and blue dot background and texture paper.  Distress edges of dot Background and Texture paper
Distress edges of both Clementine Background and Texture pieces.  Ink edges with Desert Sand.
Stamp sentiment with Twilight ink
Attach Clementine Background and Texture paper to Twilight card stock.
Attach Clementine Background and Texture paper to Sorbet card stock.  Attach to card front ½” from right and  3/8” from bottom.
Attach Dot Background and Texture paper to Crème Brulee piece and attach to card front ¾” from bottom and 1 ¾” from right side.  Attach sentiment with foam dots.
Wrap Crème Brulee Baker’s Twine around your fingers a few times.  Attach to Blue Dot  Background and Texture paper.  Attach sparkle button in center.  Attach flowers and tiny pearls to centers.

Tuesday, March 5, 2013

Technique Tuesday

Learn how to create your own patterned paper with a tone-on-tone stamping design that will give your new paper a professionally designed look!

Monday, March 4, 2013

Happy Monday Morning!

I love Mondays! It's the beginning of a new week with so many things to do and see ahead.

I had been dying to post this picture of some pillows I made for our daughter for her birthday. I had to keep them under wraps for almost 3 weeks longer than I had planned. Due to bad weather and scheduling conflicts we weren't able to get together on her birthday. I wanted to post them but I was afraid she'd happen across them. Then I forgot to post them. LOL!

Anyway, remember the rag flag quilts I did for Christmas presents?

Well, here are the other pillows I made to go with them. They really do go together.  The pictures were taken at different times of the day and there's a big window right to the right of the couch.  Thus the different lighting.

I really enjoyed sewing these as it was fun sewing for me.  Normally, all I sew is American Girl and Bitty Baby doll clothes to sell.  So, this was something different.

~~~~~~~~~~~~~~~~~~~~~~~~~~~~~~~~~~~~~~~~~~~~~~~~~~~~~~~~~~~~~~~~~
 Close To My Heart Specials

 FREE Workshop on the Go Kit
How would you like to get a free Workshop on the Go kit?  How, you ask?  Simply purchase any five (5) Workshops on the Go in one order and you'll get the sixth one FREE!  Plus, receive $25 in free Hostess Rewards.  That's $54.95 in Free products!  Don't forget, you can also get the Stamp of the Month for only $5 with your order.  In order to take advantage of this special, you must email your order to me. Or click the envelope above to reach me by email.   Do not place the order from my website as you won't be able to enter the free items there.

Visit my website to see all of the Workshops on the Go that are available.  This offer is good March 1-March 31 and only available through Suzastampin.


~~~~~~~~~~~~~~~~~~~~~~~~~~~~~~~~~~~~~~~~~~~~~~~~~~~~~~~~~~~~~
Jump for Joy


During the month of March, hostesses “jump” to the next level of Hostess Rewards when a Gathering reaches $250 or more!* More discounts and free product for hostesses. Now that’s a reason to jump for joy!

*Shipping/handling and tax applies. Only Gatherings with a total of $250 or more will qualify for the jump in Hostess Rewards or Hostess Rewards Plus! Qualifying hostesses will receive Hostess Rewards from one level only—the level that is one higher than their sales total. Offer valid March 1–31, 2013.

View Rewards 

~~~~~~~~~~~~~~~~~~~~~~~~~~~~~~~~~~~~~~~~~~~~~~~~~~~~~~~~~
Studio J


In order to allow even more time for you to create and purchase Studio J® layouts at the wonderful $5 per layout price, this offer has been extended. Now through March 15, 2013, all Studio J layouts will be $5!* That’s $1.95 savings per each two-page layout!

It’s the perfect time to get clicking with ready-made Express Collections or customize layouts with embellishments, My Stickease® accents, and unique papers and color combinations of your own. If you’ve never tried Studio J before, what are you waiting for? You’ve taken the photos. Now keep the memories!

*Shipping/handling applies. Studio J credits must be redeemed before this promotion can be applied. Offer valid February 1–March 15, 2013.

Check out Studio J