Showing posts with label Create a Card. Show all posts

Thursday, November 14, 2013

Create a Card

It's not Wednesday...so don't be confused.  LOL! I set my laptop to do maintenance yesterday morning and it took all day!  It's been a while since I've done it as I don't normally use it for much.  But, since my desktop took a dive, I've been using it and it was just time to clean things up.  So, here's yesterday's Create a Card.

The papers used are CTMH Sunset card stock, Buttercup card stock and X7173B Babycakes.  The stamp set is the August Stamp of the Month, A Chocolate Affair. This stamp set was such a fun set to work with, as I think just about everybody likes chocolate.

 4 ¼” x 5 ½” side fold card base

4 ¼” x 5 ½” Sunset card stock
1 ¼” x 5 ½” Buttercup card stock
1 ¼” x 2 ½” Buttercup card stock
1” x 5 ½” Babycakes Dot Background and Texture paper
1” x 2 ¼” White card stock

Stamp strawberry with Sunset ink and New England Ivy on white circle.  Stamp chocolate dip on scrap white card stock and cut out.  Attach to berry.  Stamp sentiment with Chocolate.
Using an embossing board or your trimmer, randomly emboss lines on Sunset card stock.
Attach Babycakes Dot Background and Texture paper to Buttercup card stock.  Attach to card front 3/8” from left.
Attach matted sentiment 1 ¼” from top as shown.  Attach image to Slate scallop circle.  Attach to card front as shown.
Attach bling

Wednesday, November 6, 2013

Create a Card

If it's Wednesday, it's a Create a Card day.  It's also hump day, but we won't go there.  LOL!!

Today's card was created with the Close To My Heart stamp set,  A Chocolate Affair.  It was the August Stamp of the Month.


The papers used for the card are also from Close To My Heart.  It's the retired Christmas paper called Jingle.  I thought it worked well with the strawberry.

Here are the instructions to recreate the card:

4 ¼” x 5 ½” side fold card base

4 ¼” x 5 ½” White card stock
2” x 2 ¾” white card stock
4” x 5 ¼” Red plaid Background and Texture paper
2 ¾” x 3 ½” Stripe Background and Texture paper
3” x 3 ¾” Cranberry card stock
2 ¼” x 3” Cranberry card stock


Stamp strawberry with cranberry and New England Ivy.  Stamp over with berry with Chocolate.
Stamp sentiment with Cranberry.
Attach red plaid Background and Texture paper to white card stock
Attach stripe Background and Texture paper to cranberry card stock. Attach to card front ½” from left and ¾” from bottom
Attach stamped image to cranberry card stock. Attach to card front 1” from right and top.
Insert three red brads as shown

If you have any questions, shoot me an email :)
Have a great Wednesday!

Wednesday, October 30, 2013

Create a Card

Happy Wednesday!  Do you know what I saw this morning??  SNOW!!  That's a nasty four letter word. :) I'm not ready for it yet!  We just had our first frost Monday night.  It looks like it's time to pull up the summer flowers.  I find it so sad to say goodbye to summer.

That said, it's a great time to get my crafting on.  See...a silver lining...yea...I keep telling myself.  I'm such a summer girl.

Here's today's Create a Card card.


It was created using the Close To My Heart August Stamp of the Month. A Chocolate Affair.  The stamp set is no longer available for order, but, I can see if anybody has an extra to spare.  

Here are the instructions to recreate the card.  It was created using the CTMH paper pack, X7173B Babycakes.


4 ¼” x 5 ½” side fold card base

4 ¼” x 5 ½” Buttercup card stock
4” x 5 ¼” Babycakes Dot Background and Texture paper
2” x 3 ½” Babycakes Letter side Background and Texture paper
2 ¼” x 3 ¾” Chocolate card stock
2 ¼” x 3 ¼” Sunset card stock
2” x 3” White card stock

Stamp sundaes with Honey, Chocolate and Sunset.  Attach to Sunset card stock
Attach Babycakes Dot Background and Texture paper to Buttercup card stock.  Attach Babycakes Letter Background and Texture paper to Chocolate card stock.
Attach Chocolate card stock to card front 7/8” from top and ¼” from right of card front.  Attach matted images ½” from right of card front and 1 ½” from bottom.
Insert Baker’s Twine through button and tie bow.  Attach to card front.

Wednesday, October 23, 2013

Create a Card

This card was created using Close To My Heart stamp set A1134, Quick Cards-Dragonfly.  The papers used are from a Close to My Heart retired paper packet called Stella.


Here are the instructions:

4 ¼” x 5 ½” top fold card base

4 ¼” x 5 ½” New England Ivy card stock
3” x 3” New England Ivy card stock
4” x 5 ¼” Stella Background and Texture Paper
1 ¼” x 5 ¼” Stella Background and Texture Paper
2 ¾” x 3” Bamboo card stock
½” x 5 ¼” Sunset card stock

Stamp sentiment with New England Ivy.
Attach Stella Background and Texture Paper to New England Ivy card stock. Create scallops on the Sunset card stock. Attach to the Stella Background and Texture Paper
Attach stamped image to New England Ivy card stock. Attach to card front flush with Stella Background and Texture Paper at top and 1” from the right.  Attach scallop/Stella at bottom.  Inset three brads.

~~~~~~~~~~~~~~~~~~~~~~~~~~~~~~~~~~~~~~~~~~~~~~
Don't have a Cricut?  Loving the trees on the front of the Holiday Gift Guide?  No problem!!  I will be doing pre-cut Rosette Tree Kits.  They will be the tree on the left.  Each kit will contain all the rosette cuts, the tree topper cuts and stamped.  It will also contain the embellishments and the cut glittery snowflakes. Each kit will be cut from one Sparkle and Shine paper pack ($9.95).  The remnants of the kit will be shipped to you.  You will also get an instruction sheet showing how to assemble your tree.  Kits will begin to ship on November 13. There will no shipping charge.   If you have any questions, shoot me an email.


Sparkle and Shine Precut Tree Kit $25.00
Included in your kit:
X7176B Sparkle and Shine Paper Packet $9.95
Precut and Stamped Toppers
12 Precut Silver Glitter Snowflakes
Red Shimmer Ribbon
Red Chevron Ribbon
One Red Badge Button
Free Postage


Wednesday, October 16, 2013

Create a Card

Happy Hump Day!

Today's card was created with all Close To My Heart products.  The paper is from the For Always paper packet.  The stamp set is B1421 Scrapbook Statements - Women.


Here are the instructions:

4 ¼” x 5 ½” top fold card base

4 ¼” x 5 ½” Black card stock
½” x 3 ¼” Black card stock (3)
4” x 5 ¼” For Always Background and Texture paper
2 ½” x 3 ¾” Cranberry card stock
2 ¼” x 3 ½” white card stock

Stamp sentiment with Cranberry ink.  Attach For Always Background and Texture paper to Black card stock.
Attach Cranberry card stock ¾” from right and top of card front.  Attach three black card stock pieces over Cranberry card stock.

Attach stamped sentiment over black pieces.  Attach piece of zip strip.  Insert three cranberry brads

Have a wonderful day!!

Wednesday, October 9, 2013

Create a Card

Happy Wednesday!

Today's card was created with Close To My Heart's B1421 Scrapbook Statements - Women.  The paper packet, also from CTMH, is X7165B For Always


.Here are the instructions:

4 ¼” x 5 ½” left fold card base

4 ¼” x 5 ½” white card stock
1 ¼” x 4 ¼” white card stock
1 ½” x 4 ¼” For Always Background and Texture Paper
1 ½” x 1 ½” For Always Background and Texture Paper (4)
1 ¾” x 4 ¼” Black card stock

Stamp sentiment with black ink.  Attach the black card stock 1/8” from bottom.  Attach For Always Background and Texture Paper to black card stock and sentiment to For Always Background and Texture Paper
Round two opposite corners on each of the For Always Background and Texture Paper pieces.  Attach to white card stock as shown.

Insert two black brads.

Wednesday, October 2, 2013

Create a Card

Happy Wednesday!!  It's supposed to be close to 80 here in upstate NY today!!!  Every one of these days is a bonus!

Today's card was created using CTMH B1421 Scrapbook Sentiments - Women.  The papers used come from the retired Flirty My Reflections Kit.


Here are the instructions:

4 ¼” x 5 ½” side fold card base

4 ¼” x 5 ½” Bamboo card stock
1” x 3 5/8” Bamboo card stock
2 5/8” x 2 5/8” NE Ivy card stock (2)
1 ¼” x 4 ¼” NE Ivy card stock
1 ¼” x 1 ¼” Flirty Background and Texture paper (8)

Attach your two 2 5/8” x 2 5/8” with one square and the other turned 90 degrees (see photo)
Then you will go one square at a time with your Flirty Background and Texture paper.  I only put adhesive in the outer corner.  That way you can slip the next piece under the previous one.  When you get to the last one, you’ll need to slide it under on both sides.  The flower Flirty will be on the diamond NE Ivy and the orange side on the square NE Ivy card stock.  Insert green brad in center

Stamp sentiment with NE Ivy ink.  Ink edges of sentiment and the card.
Attach NE Ivy card stock 1/8” from bottom.  Attach sentiment to NE Ivy

Would you like to join our Stamp a Stack Club?  For only $27, you will receive a stamp set, plus all the paper and embellishments, and instructions to create 10 cards every month.  For more info, please shoot me an email.

Thursday, July 4, 2013

Create a Card

Happy Thursday!  I'm a day late posting the next Create a Card.  Let's just say it's been a busy week so far!  As some of you may know, I sew American Girl and Bitty Baby clothes and paint mailboxes for a shop in the city.  Tourist season is in full swing, and, let's face it, I spent more hours creating with paper than I did with fabric and paint.  So, I'm pushing it now.  But, I work better under pressure :)  At least that's what I tell myself.

Anyway, the weather in upstate NY has been abysmal with rain, rain and more rain.  I saw a joke on Facebook the other day that suits it to a T.  It said "It's only rained twice this summer.  Once for 45 days and once for 35 days".  That's about it!  Tuesday afternoon we had downpours like I've never seen.  They were worse than Hurricane Irene.  The ground is so terribly saturated with water that there was no place for this water to go but into the house. UGH!  We have a finished basement, but space all around the finishing with drains to get the water and channel it outside.  There was just too much and it started to come up over the drains.  Thankfully, after Hurricane Irene we found this handy dandy little sump pump that has a spot for hoses on both ends as a big sump pump won't fit in the narrow drains.  By the time we had the pump up and going, we already had some water in the basement.  So, I spent all evening with the wet/dry vac in one spot just sucking it up and used my rug shampooer  to get the rest that was seeping in.  I wasn't sure how long the sump pump could take the pressure, so I had to get up every hour to make sure everything was ok and suck more up with the shampooer.  Thankfully, things are drying out now. 

So, without further ado...LOL!  Here's this week's card.


Today's card was created using CTMH's D1543 Country Born.  The papers are from a retired kit called Stella.  Main colors are Tulip and Sunset.

Here are the instructions:


4 ¼” X 5 ½” Side Fold card base

4 ¼” x 5 ½” Sunset card stock
2 ¼” x 2 ¾” Sunset card stock
4” x 5 ¼” Stella Background and Texture Paper
1” x 4” Stella Background and Texture Paper
2” x 2 ½” Bamboo card stock

Stamp image and sentiment with Tulip ink. Attach to Sunset card stock
Attach Stella Background and Texture Paper to Sunset card stock.
Attach two 4” pieces of Stella Zip strip 1 ½” from bottom and 1 ¼” from top.  Attach Olive side of Stella Background and Texture Paper between the Zip Strips.
Attach matted image 1 ¼” from top and 1 ½” from bottom.
Wrap Baker’s Twine twice around card front and tie knot.

This card was created for my Stamp a Stack Club.   Each month in the Stamp a Stack Club, one creates 10 unique cards designed by me.  In your Stamp a Stack Club package, you receive a stamp set, and all the paper and embellishments to create these cards for only $27!  If you'd like to join the club, whether you are near or far, please email me and I'll get you set up.

Have a great 4th of July and stay cool!!

Wednesday, June 26, 2013

Create a Card


Today's card is one we did back in May 2010 in the Stamp a Stack Club.  Because of that, neither the stamp set or the My Reflections Kit is still available.  But, I thought  you'd like the directions. :)

 
4 ¼” x 5 ½” left fold card base
4 ¼” x 5 ½” white cardstock
2” x 4” Splendor Flower Background and Texture Paper
1 ½” x 4” Splendor Flower Background and Texture Paper
1” x 4” Topiary Background and Texture Paper
1” x 4” Goldrush Background and Texture Paper
¾” x 4” Moonstruck cardstock
2” x 9” Moonstruck cardstock
2” x 2” Goldrush cardstock (4)
1 7/8” x 1 7/8” White cardstock (4)

Stamp on the 1 7/8” square white cardstocks: Moonstruck bird, Goldrush fish, Goldrush Owl with Hello Friends under it, Topiary frog.


Attach Background and Texture papers to 4 ¼” x 5 ½” white cardstock from top down leaving 1/8” from top/sides/bottom:
Splendor Flower Background and Texture paper
Topiary Background and Texture paper
Goldrush Background and Texture paper
Splendor Flower Background and Texture paper

Score the 2” x 9” Moonstruck cardstock at 2”, 2 ¾”, 3 ½”, and 4 ¼”. Fold at scores as shown.
Attach ¾” x 4” Moonstruck card stock at top of Splendor Background and Texture paper with brads as shown at left. 
Insert 2” x 9” Moonstruck piece under ¾” x 4” Moonstruck piece as shown.  Do not use adhesive

 
Next, attach this piece to the horizontal strip you just attached to the card front. To do this, slide the longest section of piece A between the horizontal strip and the card, making sure to center it in the middle of your card. Line up the very edge of the scored end of piece with bottom of the horizontal strip and attach with adhesive.

Note: the adhesive placement is very important, you do not want to attach the scored side and the longest section of piece together


Attach each stamped image to Goldrush card stock pieces.
Attach owl/hello friends piece to bottom fold
Attach each of the other stamped images successively from bottom to top.
Attach small piece of ribbon to bottom slider with staple/brad or other fixture.

If you need further visual instructions, you may find them at


Have fun!!  I'd love to see the cards you create.  So, feel free to email photos to my email address.  I'd also like to post your creations, so please let me know if you'd like to have yours posted.


~~~~~~~~~~~~~~~~~~~~~~~~~~~~~~~~~~~~~~~~~~~~~~~~~~~~~~

As I posted the other day, the retired list is out.  If there's something you would like, especially any of the paper packets, you better grab them quickly as they are selling out.  The following paper packets are now completely sold out.

  • X7155B Avonlea 
  • X7157B Dakota
  •  X7166B Claire
  • X7167B Later Sk8r (only 25 left)
  • X7164B Buzz and Bumble (only 95 left)
The Workshops on the go of Claire and Later Sk8r are in very limited quantities.

~~~~~~~~~~~~~~~~~~~~~~~~~~~~~~~~~~~~~~~~~~~~~~~~~~~~~~~~

The CTMH convention starts today.  I'll be monitoring the action and will post some sneak peaks.  So, be sure to check back over the next few days.

Wednesday, June 19, 2013

Create a Card

This week's card is another card created in our Stamp a Stack club.  It was created using CTMH's April Stamp of the Month.


The paper pack used is also by CTMH.  It's X7169B Tommy.


4 ¼” x 5 ½” top fold card base

4 ¼” x 5 ½” White card stock
1” x 4 ¼” White card stock
4” x 5 ¼” Honey card stock
3 ¾” x 5” Tommy Stripe Background and Texture paper
1 ¼” x 4 ½” Outdoor Denim card stock

Attach Tommy Stripe to Honey card stock, then to White card stock.
Stamp sentiment with Outdoor Denim and attach to Outdoor Denim card stock.  Insert Honey button-brad in bottom right corner.  Attach to card front 2” from top and 1” from right.
Stamp bird with Honey ink.  Attach to card front. Wrap Baker’s Twine around card front.

 Each month in the Stamp a Stack Club, one creates 10 unique cards designed by me.  In your Stamp a Stack Club package, you receive a stamp set, and all the paper and embellishments to create these cards for only $27!  If you'd like to join the club, whether you are near or far, please email me and I'll get you set up.

~~~~~~~~~~~~~~~~~~~~~~~~~~~~~~~~~~~~~~~~~~~~~~~~~~~~~~~~

Let's Get Patriotic!!
Celebrate military service and promote patriotism with our new patriotic stamp sets—available only from June 1 to July 31, 2013. Three dollars from each B-size My Acrylix® Courage stamp set and $5 from each D-size My Acrylix® Home of the Brave stamp set will be donated to the USO, the leading, most recognized military-support and services organization in the country. Show your support with your own patriotic stamp set!
These stamp sets will only be available from June 1 through July 31.

Flyer

~~~~~~~~~~~~~~~~~~~~~~~~~~~~~~~~~~~~~~~~~~~~~~~~~~~~~~~~~~~

  Relief for Oklahoma

The tornado in Oklahoma has had a devastating effect and Close To My Heart wants to help. To aid relief efforts, Close To My Heart is making a new Autumn/Winter 2013 stamp set, A True Thank You ($2.95 retail), available immediately and will donate 100% of the profits from sales of the set from May 23 through June 30 to the American Red Cross. Help us provide relief to those affected by the Oklahoma tornado by promoting the A True Thank You stamp set (M1029).


Be sure to check out all of the"While Supplies Last" items on my website.  Embellishments for $1.50, 6" x 6" albums for $2, papers for $3!  You can't go wrong with those prices!!

Wednesday, June 12, 2013

Create a Card

Happy Wednesday!!

Today's Create a Card was created using CTMH's Tommy papers and the April Stamp of the Month as part of our Stamp a Stack club.

Here are the instructions:


4 ¼” x 5 ½” side fold card base

4 ¼” x 5 ½” Honey card stock
3” x 3 ½” Honey card stock
4” x 5 ¼” Large Print Tommy Background and Texture paper
3 ¾” x 5” Stripe Tommy Background and Texture paper
2 ¼” x 4” Outdoor Denim card stock

White card stock piece will be cut down to 2 ¾” x3 ¼”, but start with a larger piece.  You will stamp the round stamp four times on this larger piece so that it can be cut down to create a square with no open spots on the outside.  The middle will have an open space, but you’ll attach the sentiment over it. After cutting down, stamp “You’re Tweet” with Outdoor Denim.
Attach Large Print Background and Texture paper to Honey card stock.  Attach Stripe Background and Texture paper to it.  Attach Outdoor Denim card stock ¾” from bottom and ½” from left.
Mat sentiment square on Honey card stock and attach to card front 1” from bottom and ½” from right.  Attach Outdoor Denim sentiment with foam dots in center to cover unstamped spot.

Here's a picture of the April Stamp of the Month.  While it's not available through CTMH anymore, if you'd like it, I can try and get one from another consultant.
 Each month in the Stamp a Stack Club, one creates 10 unique cards designed by me.  In your Stamp a Stack Club package, you receive a stamp set, and all the paper and embellishments to create these cards for only $27!  If you'd like to join the club, whether you are near or far, please email me and I'll get you set up.
~~~~~~~~~~~~~~~~~~~~~~~~~~~~~~~~~~~~~~~~~~~~~~~~~~~~~~~~~~~~~
There's still lots of deeply discounted CTMH products available on my website.
    
6x6 albums for only $2.00!  Embellishments for $1.00-$2.00!  Paper for $3!  Stop by my website and check them out!

Have a wonderful Wednesday!!

Wednesday, June 5, 2013

Create a Card

Good morning!  I hope you are having one!  I think I will be as I need to get outside and plant some bulbs and finish placing the outdoor garden items in the yard.  We're supposed to get heavy rains for Friday and Saturday, so I want to make sure I have it done so I can play with paper over the weekend :)

Today's Create a Card was created using CTMH's April Stamp of the Month as part of the monthly Stamp a Stack club.

The paper used is CTMH's Claire paper packet.

Here are the instructions:


4 ¼” x 5 ½” side fold card base

4 ¼” x 5 ½” Outdoor Denim card stock
2 ¾” x 4” Outdoor Denim card stock
4” x 5 ¼” Claire Floral Background and Texture paper
2 ½” x 3 ¾” Claire Sunset Background and Texture paper

Stamp balloon with Sunset and Outdoor Denim ink.  Curve the sentiment on your block and stamp with Outdoor Denim on white card stock. Hand cut to make banner.  Attach to a piece of Outdoor Denim card stock and cut around it to form banner.

Attach Claire Floral Background and Texture paper to Outdoor Denim card stock
Attach Claire Sunset Background and Texture paper to Outdoor Denim card stock.  Attach spiral at top right. Attach stamped balloon and matted sentiment as shown.

 Each month in the Stamp a Stack Club, one creates 10 unique cards designed by me.  In your Stamp a Stack Club package, you receive a stamp set, and all the paper and embellishments to create these cards for only $27!  If you'd like to join the club, whether you are near or far, please email me and I'll get you set up.

Have a good one!

Wednesday, May 29, 2013

Create a Card

Happy Wednesday!  Hope you have sun shiny weather where you are!  Rain here this morning, but it's going to be close to 90 by the end of the week!  Bring it!

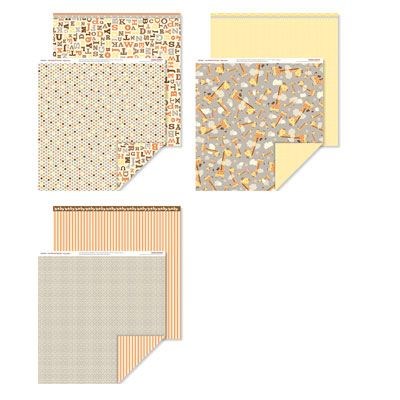
Today's Create a Card.  It was created using CTMH's Claire My Reflections Kit.  The stamp set used is the April Stamp of the Month, which is no longer available.


Here are the instructions:


4 ¼” x 5 ½” side fold card base

1 ¼” x 4” Claire Floral Background and Texture paper
1 ½” x 4” Claire Floral Background and Texture paper
1 ½” x 4” Claire Sunset side Background and Texture paper
2” x 3 ¼” Claire Sunset side Background and Texture paper
2 ¼” x 3 ½” Outdoor Denim card stock
1 ½” x 4 ¼” Outdoor Denim card stock

Attach 1 ¼” x 4” Claire Floral Background and Texture paper to left side of card.  Attach the other floral piece to right of card front.  Attach the sunset Background and Texture paper in the middle. 
Attach the larger Sunset Background and Texture paper piece to Outdoor Denim card stock.  Attach to card front 2” from bottom and 3/8” from right side.
Stamp bird with Hollyhock and sentiment with Outdoor Denim
Cut one 4 ¾” piece of ribbon and insert through ribbon slide.  Cut another piece of ribbon 3 ½” long. Cut V on both ends and insert through ribbon slide. Attach to card front.

  Each month in the Stamp a Stack Club, one creates 10 unique cards designed by me.  In your Stamp a Stack Club package, you receive a stamp set, and all the paper and embellishments to create these cards for only $27!  If you'd like to join the club, whether you are near or far, please email me and I'll get you set up.

~~~~~~~~~~~~~~~~~~~~~~~~~~~~~~~~~~~~~~~~~~~~~~~~~~~~~~~~~~~~

Dream Pop Anyone?

It seems like everywhere I go lately, I seem Dream Pop colors!  Here's a picture of yarn from AC Moore that I snapped yesterday.  I also saw some storage boxes at another store, but I can't remember which one :)


The supplies of the Dream Pop paper are dangerously low.  There's only 11% of stock left and the promotion doesn't end until Friday.  So, if this fabulous paper was on your must have list, it's best to get that order in today.  Once it gets this low, we could sell out at any time.


They can be yours for only $10 with a $35 purchase!  How, you ask? 

In honor of National Scrapbooking Month, you can get the yummy Dream Pop paper packet for only $10 when you spend $35 in May (valued at $19.95 retail)! This exclusive paper packet includes 12 card stock sheets as well as 12 B&T Duos® papers that were specifically designed for this promotion only—you can’t get these sweet colors and patterns anywhere else! Start National Scrapbooking Month off right with a unique paper packet at a bargain price and get your creative juices flowing! Also, consider hosting this month: Hostesses receive one paper packet free with qualifying May Gathering sales totals of $400 or more.
*Shipping/handling and tax apply. Not available for purchase at full retail. Offer valid May 1–31, 2013, while supplies last. Qualifying purchases must be current, retail-priced product.
Dates: Offer valid May 1–31, 2013.


What is included in the Dream Pop paper packet?
The Dream Pop paper packet, created specifically for National Scrapbooking Month in May, includes:
  • 12 exclusive B&T Duos® papers (2 each of 6 designs)
  • 12 coordinating card stock sheets (2 each of 6 kit-exclusive colors)
  • an artwork idea insert
The card stock sheets have glossy patterns on one side that coordinate with the B&T patterns for a pop of shine on the colorful card stock. The colors of the cards tock sheets and B&T papers are specialty colors exclusive to this paper packet only. It has a retail value of $19.95.

Be sure to click on the flyer as you'll have a much better idea how gorgeous this paper really is!

Thursday, May 23, 2013

Create a Card

I'm a day late posting this.  We've been having some nice weather and I got carried away at Lowe's getting flowers, so I've been planting like a crazy woman.  I can't wait for them all to fill out.

So, without further ado :)  here is this week's card.


This card was created using CTMH's Avonlea paper and C1539 Scrapbook Sentiments - Poets stamp set.

Here are the directions:


4 ¼” x 5 ½” side fold card base

4 ¼” x 5 ½” Whisper card stock
2 ½” x 4” Whisper card stock
4” X 5 ¼” Avonlea Background and Texture paper
2 ¾” x 4 ¼” Chocolate card stock

Stamp sentiment with Chocolate ink on Whisper card stock. Attach to Chocolate card stock.
Attach Avonlea Background and Texture paper to Whisper card stock.  Attach matted image to card front ½” from right and bottom of card front.
Cut 4 ½” of satin dot ribbon and cut V on one end.  Attach to card front.  Attach a piece of Chocolate ribbon and gray ribbon on top of satin ribbon.  Insert waxy flax through holes of button and tie in bow.